
Take a look at our process for making Native American style flutes. The photo-diagrams and steps show how a well-selected block of wood winds up as an exquisite flute pouring out a hauntingly beautiful sound.
Superior flutes
From start to finish one individual designs and crafts all of the Native American style flutes that we offer. The artisan carefully selects blocks of wood for character and color. He creates flutes in the woodlands style using modern methods, including precision tuning, yet honors native tradition. The finished flutes possess characteristics including…
- solid construction
- durability
- exceptional sound
- visual elegance
Process for making flutes in the style of Native American flutes
- Select foreign or domestic woods possessing aesthetic character and color.
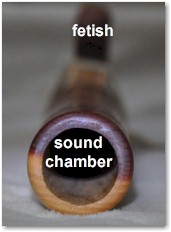
- Take a solid 2″ x 2″ block of kiln-dried wood, approximately 20 to 25 inches – longer for lower keys – and bore a hole most of the length using an appropriately-sized gun drill bit. This becomes the sound chamber where the finger holes are placed.
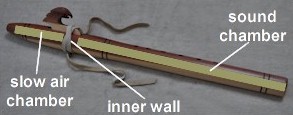
- At the other end bore a breath hole and “slow air channel”. Between the sound chamber and the slow air channel remains a plug or inner wall of wood (you cannot look through a flute as you would a pipe).
- Place the hollowed-out block of wood on a lathe and sculpt the outer flute shape with a precise wall thickness for the sound chamber.
- Sand the wood for a first pass.

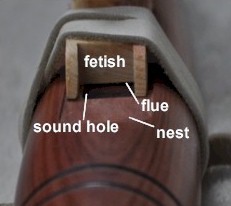
- On a milling machine, precision-carve the “nest” where the “fetish” (or block) later sits like a bird on eggs.
- Within the nest carve and file in the sound hole and the slow-air-chamber-exit hole (underneath fetish). The air comes from your lungs through the flute’s mouthpiece into the “slow air channel” (which lies between the mouthpiece and slow-air-chamber-exit hole). The air then rises through the slow-air-chamber-exit hole, enters the flue between the bottom of the fetish and the mouthpiece-end of the nest, turns into a thin layer of air to flow across the sound hole. At the far end of the sound hole the air layer is split with some of it entering the sound chamber and the rest exiting above the nest.
- Before finger holes are created, voice the flute (give the instrument its fundamental note…”G” for a flute in key of G) and cut to length.
- Accomplish the voicing through gradual adjustments of the sound hole, flue and overall length of flute.
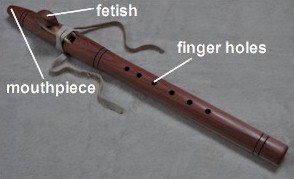
- When the flute produces the fundamental note successfully, locate and burn-in the finger holes.
- Tune each hole precisely to the required note. Check and tune cross-finger holes.
- After 24 hours re-check the tuning for each hole.
- Apply final sanding to inside and outside.
- Submerge into natural oil finish and soak.
- Apply appropriate coats of finish to the exterior for the desired gloss.
- Once the flute has dried for several days, apply final coating of natural wax.
- Inspect flute and verify tuning.
- Ship completed flute to a new owner who will give it a voice.
The description of the Native American style flute making process above results in completed flutes such as the one pictured below.
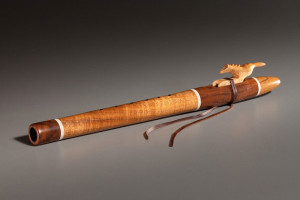
See our gallery of Native American style flutes resulting from the above Native American style flute making steps by the craftsman of these flutes. You might also be interested in plans to make a flute.